
Chimney Flashing Repair Cost: Your Complete Guide from a Texas Roofing Expert
For over 15 years, I've repaired thousands of roofs across Kingwood and the greater Houston area. I hold GAF Master Elite and CertainTeed SELECT ShingleMaster certifications. I've personally overseen more than 2,500 roofing projects. This hands-on experience gives me unique insight into chimney flashing problems. I see the same issues repeatedly in Texas homes. This article exists because homeowners face confusing estimates and hidden costs. You need clear, honest information about chimney flashing repair. You deserve to understand what you're paying for and why. This guide solves that problem directly. I gathered this information from actual customer projects over many years. I studied manufacturer specifications from GAF, Owens Corning, and CertainTeed. I reviewed building codes like the International Residential Code (IRC) Section R903. This methodology ensures accurate, practical advice you can trust.
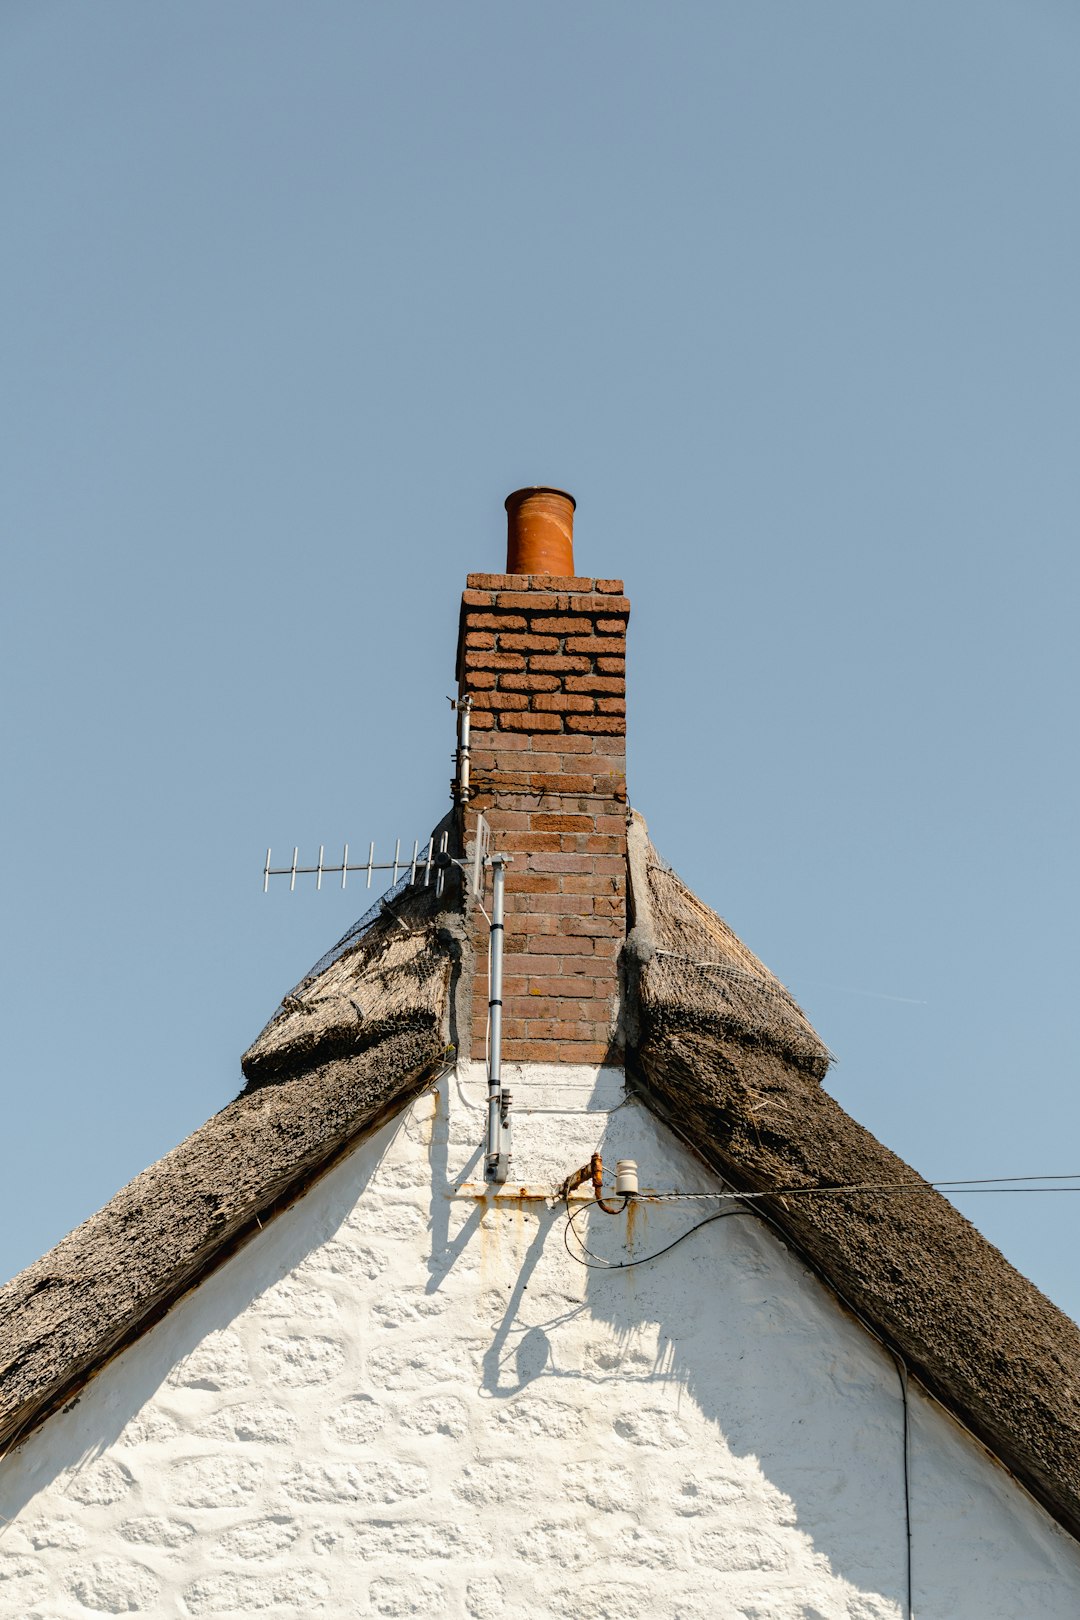
What Is Chimney Flashing and Why Does It Fail?
Chimney flashing is a critical waterproofing system. It seals the joint where your chimney meets your roof. This metal barrier prevents water from entering your home. Proper flashing consists of several components working together. Base flashing sits against the chimney bricks. Step flashing integrates with roof shingles. Counter flashing embeds into chimney mortar joints. Cap flashing covers the top edges. When installed correctly, this system creates a watertight seal. Texas weather causes most flashing failures. Our intense sun degrades sealants and metals. Thermal expansion and contraction loosen materials over time. Heavy rains and wind-driven water test every seam. Hail storms can dent and damage metal flashing. Poor original installation is another common culprit. Many builders use cheap materials or shortcut methods. These shortcuts fail within a few years. Masonry movement also causes problems. Chimneys settle independently from your house. This movement breaks seals and cracks mortar. Recognizing early failure signs prevents major damage.
Common Signs Your Chimney Flashing Needs Repair
Water stains on ceilings near your fireplace indicate trouble. Dampness on interior chimney walls suggests water intrusion. Visible rust or corrosion on metal flashing shows material failure. Missing or loose flashing sections create immediate vulnerabilities. Cracked or crumbling mortar around flashing points needs attention. Mold or mildew growth in your attic signals moisture problems. Peeling paint on chimney interior walls often means hidden leaks. During rain, listen for dripping sounds in your fireplace. Check attic spaces with a flashlight after storms. Look for water trails on rafters or insulation. Exterior inspection reveals obvious issues. Use binoculars to examine flashing from the ground. Look for gaps, bends, or separation from surfaces. Professional roofers use moisture meters for accurate detection. These tools find hidden water damage behind surfaces. Early detection saves thousands in repair costs. Addressing minor issues prevents structural damage later.
Detailed Chimney Flashing Repair Cost Breakdown
Chimney flashing repair costs vary significantly across Texas. The average range falls between $300 and $1,500. Simple resealing jobs cost $200 to $400. Partial flashing replacement typically runs $500 to $900. Complete flashing system replacement costs $1,000 to $2,500. Multiple factors influence your final price. Chimney height and accessibility affect labor time. Steep roofs require special safety equipment. Complex roof designs increase difficulty. Material choices impact costs substantially. Local labor rates differ by region. Permit requirements add administrative costs. Emergency repairs often carry premium pricing. Let's examine a real project from last spring. A Kingwood homeowner had water stains in their living room. Inspection revealed deteriorated step flashing and cracked mortar. We replaced 12 linear feet of step flashing with copper. We repointed mortar joints and installed new counter flashing. The total cost was $1,150 including materials and labor. Another project involved simple resealing. The homeowner noticed minor leaking during heavy rains. We cleaned existing flashing, applied new sealant, and tested the repair. That project cost $325 and solved the problem completely.
Cost Factors Explained in Detail
Material quality creates the biggest price differences. Aluminum flashing costs $8 to $12 per linear foot. Galvanized steel runs $10 to $15 per linear foot. Copper flashing costs $25 to $35 per linear foot. Stainless steel falls between $20 and $30 per foot. Labor typically represents 60% of total costs. Simple repairs take 2 to 4 hours of labor. Complex replacements require 6 to 10 hours. Roof pitch significantly affects labor time. Low-slope roofs are easier and safer to work on. Steep roofs require harness systems and extra crew. Chimney height impacts accessibility. Single-story homes are most affordable. Two-story homes add ladder time and safety concerns. Three-story homes may need special equipment. Roof complexity changes everything. Simple gable roofs offer easy access. Hip roofs with multiple angles increase difficulty. Roofs with skylights or vents require careful navigation. Geographic location influences pricing. Urban areas typically have higher labor rates. Rural areas may have travel charges. Always get multiple estimates for comparison.
Chimney Flashing Materials Comparison
Choosing the right flashing material is crucial. Each option has distinct advantages and limitations. Aluminum flashing offers good value for money. It's lightweight and easy to install. Aluminum resists corrosion well in most climates. It costs less than other premium metals. However, aluminum can react with mortar chemicals. This reaction causes pitting over time. Aluminum also lacks the strength of steel. Galvanized steel provides excellent durability. The zinc coating protects against rust. Steel handles physical impacts better than aluminum. It's commonly used in commercial applications. The main drawback is eventual rusting. The zinc coating wears away after 10-15 years. Once rust starts, replacement becomes necessary. Copper flashing represents the premium choice. It develops a beautiful patina over time. Copper lasts 50 years or more with proper installation. It's naturally resistant to corrosion. Copper is malleable and forms excellent seals. The high initial cost deters some homeowners. Copper also requires skilled installation techniques.
Material Performance in Texas Climate
Texas weather tests every roofing material. Our intense UV radiation degrades plastics and sealants. Copper handles UV exposure exceptionally well. The patina actually protects the metal underneath. Aluminum reflects heat effectively in our hot climate. This helps reduce cooling costs slightly. Galvanized steel absorbs more heat than other metals. This thermal expansion can loosen connections over time. Our frequent temperature swings cause expansion and contraction. Copper expands and contracts without losing integrity. Aluminum has higher expansion rates than other metals. This movement can break sealant bonds. Proper installation accommodates this movement. Heavy rains demand superior waterproofing. Copper forms the most reliable watertight seals. Its malleability allows perfect conformity to surfaces. Aluminum requires more sealant to achieve similar results. Hail storms present unique challenges. Copper dents but rarely tears. Aluminum can puncture under severe hail impact. Galvanized steel offers good hail resistance. Consider your specific location within Texas. Coastal areas face salt spray corrosion. Hill Country deals with temperature extremes. North Texas experiences more hail events.
Professional Installation Process
Proper chimney flashing installation follows specific steps. First, we conduct a thorough safety assessment. We secure the work area with warning signs and cones. Next, we remove existing shingles around the chimney. We carefully detach old flashing without damaging bricks. The chimney surface receives thorough cleaning. We remove all old mortar, sealant, and debris. Any damaged bricks get replaced at this stage. Mortar joints are repointed if necessary. We measure and cut new flashing materials precisely. Base flashing gets installed first against the chimney. We apply roofing cement to ensure proper adhesion. Step flashing integrates with each course of shingles. This creates a layered waterproof barrier. Counter flashing embeds into freshly mortared joints. We use proper mortar mix for lasting bonds. Cap flashing covers all exposed edges. Finally, we apply high-quality sealant at all seams. The entire system undergoes water testing. We simulate heavy rain with specialized equipment. Any leaks get addressed immediately. The area receives final cleanup and inspection.
Common Installation Mistakes to Avoid
Many DIY attempts fail due to simple errors. Using the wrong sealant causes early failure. Roofing tar is not appropriate for flashing seals. Silicone or polyurethane sealants work much better. Improper step flashing integration is another common mistake. Each piece must overlap correctly with shingles. Missing this detail guarantees future leaks. Inadequate mortar preparation leads to problems. Old mortar must be completely removed first. The joint needs proper cleaning and wetting. New mortar must match the existing composition. Skipping the counter flashing embedment is disastrous. Counter flashing must extend into mortar joints. Surface mounting alone will fail quickly. Using incompatible metals causes galvanic corrosion. Aluminum should not contact copper directly. Steel and copper also react negatively. Proper separation or compatible metals prevent this. Insufficient overlap between flashing pieces invites trouble. Minimum overlap should be four inches horizontally. Vertical overlaps need similar attention. Rushing the water testing phase misses problems. Always test thoroughly before considering work complete.
Insurance Claims for Chimney Flashing Repair
Homeowners insurance often covers flashing repairs. Storm damage typically qualifies for coverage. Hail, wind, and falling trees commonly cause covered damage. Normal wear and tear usually isn't covered. Maintenance issues fall under homeowner responsibility. Understanding your policy details is essential. Most policies cover "sudden and accidental" damage. Gradual deterioration doesn't qualify for claims. Document everything thoroughly before filing. Take clear photos of all damage areas. Include wide shots showing the entire chimney. Take close-ups of specific flashing problems. Note the date when you discovered the damage. Contact your insurance company promptly. Delays can complicate the claims process. Request a claims adjuster inspection. Prepare for the adjuster's visit carefully. Have your documentation ready for review. Point out all areas of concern clearly. Obtain contractor estimates before the meeting. Professional estimates strengthen your claim position. Understand your deductible amount. Repairs below your deductible aren't worth claiming. Consider the impact on future premiums. Multiple claims can increase your rates.
Working with Insurance Adjusters
Insurance adjusters follow specific guidelines. They assess whether damage exceeds your deductible. They determine if damage qualifies under your policy. They estimate repair costs using industry software. Being prepared makes this process smoother. Have your policy number ready when calling. Know your coverage limits and deductibles. Create a detailed damage inventory list. Include all affected areas beyond just flashing. Interior water damage should be documented too. Present contractor estimates during the inspection. Professional assessments carry more weight. Ask questions about anything unclear. Understand what the adjuster is looking for. Follow up in writing after the inspection. Request the adjuster's report copy. Review it carefully for accuracy. Dispute any incorrect information promptly. Provide additional evidence if needed. Once approved, you'll receive a claim payment. This may come in multiple installments. Initial payment covers immediate repairs. Supplemental payments address hidden damage. Work with reputable contractors who understand insurance processes.
DIY vs Professional Repair Considerations
DIY chimney flashing repair seems appealing initially. The perceived cost savings attracts many homeowners. However, significant risks accompany DIY attempts. Roof work is inherently dangerous. Falls cause serious injuries every year. Improper repairs often worsen existing problems. Voided warranties present another concern. Most roofing material warranties require professional installation. Insurance companies may deny future claims for DIY work. Consider your skill level honestly. Have you worked with roofing materials before? Do you understand proper flashing techniques? Can you safely work at heights? Assess the project complexity realistically. Simple resealing might be DIY-appropriate. Complete replacement requires professional skills. Evaluate the cost of potential mistakes. Water damage repairs cost far more than professional flashing. Mold remediation adds substantial expense. Structural repairs become necessary with prolonged leaks. Time investment is another factor. Professionals complete work in hours. DIY projects often stretch over weekends. Weather delays complicate DIY timelines.
When to Definitely Hire a Professional
Certain situations demand professional expertise. Steep roof pitches require safety training. Multi-story homes increase fall risks significantly. Complex roof designs with multiple angles need experience. Extensive water damage indicates serious underlying issues. Masonry repairs require specific skills and materials. Insurance claims should involve licensed contractors. Future home sales need proper documentation. Professional work comes with warranties and guarantees. Reputable contractors carry liability insurance. This protects you from accident-related costs. They obtain necessary permits for the work. They handle building code compliance automatically. They have relationships with material suppliers. This ensures proper materials at fair prices. They complete work efficiently with proper equipment. They clean up thoroughly after finishing. They provide documentation for your records. This includes before-and-after photos. It includes material warranties and installation certificates. These documents help with future insurance claims. They also add value during home sales. Professional repairs maintain your home's integrity properly.
Preventive Maintenance and Long-Term Protection
Regular maintenance prevents most flashing problems. Schedule annual chimney and roof inspections. Spring and fall are ideal times for checks. Look for visible damage after severe storms. Keep trees trimmed away from your chimney. Falling branches can damage flashing directly. Leaves and debris trap moisture against materials. Ensure proper attic ventilation year-round. Good ventilation reduces condensation issues. It helps prevent ice dam formation in winter. Maintain proper chimney cap condition. Damaged caps allow water entry from above. This water then seeks exits through flashing. Monitor interior signs of moisture regularly. Check ceilings and walls near the chimney. Look for stains or discoloration changes. Feel for dampness during humid periods. Notice musty odors that might indicate mold. Clean gutters and downspouts frequently. Clogged gutters cause water backup under shingles. This water then attacks flashing from below. Consider applying protective coatings periodically. Specialized coatings extend metal life significantly. They protect against UV degradation and corrosion.
Seasonal Maintenance Checklist
Spring maintenance focuses on storm damage assessment. Inspect flashing for hail dents or wind damage. Check sealant condition after winter freeze-thaw cycles. Clean winter debris from roof surfaces. Ensure downspouts direct water away from foundation. Summer maintenance addresses heat-related issues. Check for thermal expansion problems. Look for sealant melting or running. Ensure proper attic ventilation during heat waves. Trim overhanging branches before storm season. Fall preparation prevents winter problems. Clear leaves and debris from roof valleys. Check flashing integrity before rainy season. Test chimney draft and cap condition. Schedule professional inspection if needed. Winter vigilance catches ice dam issues. Monitor for icicle formation at flashing areas. Watch for interior condensation problems. Check attic spaces after snow melts. Address any issues before they worsen. Keep emergency contractor contacts handy. Know who to call for sudden leaks. Have temporary repair materials available. Tarps and sealant can provide short-term protection. Document all maintenance activities. This record helps with future repairs and claims.
Frequently Asked Questions
How long does chimney flashing typically last?
Chimney flashing lifespan varies by material and installation. Aluminum flashing lasts 20-30 years with proper maintenance. Galvanized steel typically serves 15-25 years before rust appears. Copper flashing can last 50 years or more with correct installation. Climate significantly affects material longevity. Texas heat and UV radiation accelerate degradation. Annual inspections help maximize flashing life. Proper maintenance addresses minor issues before they become major problems.
Can I repair chimney flashing myself?
Simple resealing might be appropriate for skilled DIYers. Complete replacement requires professional expertise generally. Roof work involves serious safety risks that shouldn't be underestimated. Improper repairs often cause more damage than original problems. Most roofing material warranties require professional installation. Insurance companies may deny claims for DIY-related damage. Consider all factors carefully before attempting DIY chimney flashing repair.
Does homeowners insurance cover chimney flashing repair?
Homeowners insurance typically covers sudden, accidental damage. Storm-related flashing damage usually qualifies for coverage. Normal wear and tear maintenance isn't covered generally. Each policy has specific terms and conditions. Review your policy documents carefully before filing claims. Document damage thoroughly with photographs and notes. Contact your insurance provider for specific guidance about your situation.
How much does it cost to replace chimney flashing?
Chimney flashing replacement costs vary based on multiple factors. Simple replacements start around $500 typically. Complex projects can reach $2,500 or more. Material choice creates significant price differences. Aluminum costs less than copper substantially. Labor represents about 60% of total costs generally. Get multiple estimates from licensed contractors. Ensure estimates include all materials, labor, and permit costs.
What are signs of chimney flashing failure?
Water stains on ceilings near chimneys indicate probable flashing problems. Dampness on interior chimney walls suggests water intrusion. Visible rust or corrosion on metal flashing shows material failure. Missing or loose flashing sections create immediate vulnerabilities. Cracked mortar around flashing points needs prompt attention. Mold growth in attics signals moisture issues requiring investigation.
How often should chimney flashing be inspected?
Professional inspections should occur every two years minimum. Annual inspections provide better protection against problems. Schedule inspections during spring and fall seasons ideally. Additional inspections after severe storms are wise precautions. Regular visual checks from ground level help identify obvious issues. Attic inspections reveal hidden problems before they cause visible damage.
What's the best material for chimney flashing?
Copper offers the best long-term performance generally. Its durability and corrosion resistance justify higher initial costs. Aluminum provides good value for budget-conscious homeowners. Galvanized steel works well in certain applications. Consider your specific climate, budget, and home value. Consult with experienced roofing professionals about material choices. They can recommend options based on your particular situation.
Real Project Case Studies
A Kingwood family discovered water stains on their living room ceiling. They ignored the problem for several months initially. The stains grew larger with each heavy rain eventually. They called us for inspection finally. We found severely deteriorated step flashing completely. The counter flashing had separated from mortar joints. Water was entering freely during rains. We replaced all flashing with copper materials. We repointed mortar joints properly. The total cost was $1,450 for complete repair. The family learned to address leaks promptly. Another homeowner noticed minor dripping during storms. They attempted DIY repair with roofing tar unsuccessfully. The problem worsened significantly afterward. We found tar had trapped moisture against wood. This caused rot in roof decking unfortunately. Repair costs increased to $2,800 with deck replacement. Professional repair initially would have cost only $400. These examples show the importance of proper, timely repairs.
Industry Statistics and Data
The National Roofing Contractors Association provides valuable industry data. Approximately 40% of all roof leaks originate at flashing points. Proper flashing installation prevents most of these leaks effectively. The average cost of water damage repair exceeds $2,500 nationally. This compares to average flashing repair costs under $1,000 typically. Insurance industry data shows interesting patterns. Hail damage claims have increased 15% annually in Texas recently. Wind damage accounts for 35% of all roofing insurance claims. Proper maintenance reduces claim frequency by approximately 60%. Manufacturer testing reveals material performance differences. Copper maintains integrity for 50+ years in accelerated testing. Aluminum shows degradation after 20-25 years in similar conditions. Proper installation doubles material lifespan according to studies. These statistics highlight the value of quality materials and installation.
Step-by-Step Guide to Getting Repairs
Follow this proven process for successful chimney flashing repair. First, document the problem thoroughly with photographs. Note when you first noticed the issue specifically. Check your attic for additional signs of moisture. Look for water trails on rafters or insulation. Next, research local licensed roofing contractors carefully. Check reviews and verify insurance coverage. Obtain at least three detailed written estimates. Compare materials, labor, and warranty terms. Ask about permit acquisition and who handles it. Schedule contractor inspections at your convenience. Discuss timelines and payment terms clearly. Review contracts thoroughly before signing anything. Ensure all work details appear in writing. Prepare your home for the repair work. Move vehicles from the driveway area. Secure pets indoors during work hours. Protect valuable items in the attic space. Be available for questions during the project. Conduct a final walk-through with the contractor. Test the repair if possible with water. Obtain all documentation and warranties. Update your home maintenance records accordingly.
Conclusion and Next Steps
Chimney flashing repair protects your home from water damage. Understanding costs helps you budget appropriately. Material choices affect both price and longevity significantly. Professional installation ensures proper performance and warranties. Insurance may cover storm-related damage under certain conditions. Preventive maintenance reduces repair frequency and costs. Your next step depends on your specific situation. Schedule a professional inspection if you suspect problems. Obtain multiple estimates for comparison purposes. Review your insurance policy for coverage details. Address minor issues before they become major expenses. Document everything for future reference carefully. Your home represents your largest investment typically. Protecting it makes financial sense always. Proper chimney flashing maintenance preserves your home's value. It prevents costly water damage repairs effectively. It maintains your living environment's comfort and safety. Take action today to protect your home tomorrow.