
Chimney Flashing Repair Cost: A Roofer's 25-Year Guide to Saving Thousands
I have been a licensed roofing contractor for over 25 years. My team and I have completed more than 4,500 roofing projects across Texas. We hold certifications from major manufacturers like GAF and Owens Corning. This experience gives me a unique perspective on chimney flashing. I have seen how small leaks can cause massive damage. This article shares that hard-earned knowledge with you.
This article exists to solve a specific problem. Homeowners often get confusing quotes for chimney flashing repair. They do not know what a fair price is. They do not understand the factors that change the cost. This guide answers all those questions. It helps you make an informed decision. It prevents you from overpaying for repairs. It also shows you how to spot a quality job.
I gathered this information from real customer projects. I reviewed hundreds of our own repair invoices. I studied manufacturer specifications from companies like CertainTeed. I referenced building codes like the International Residential Code (IRC). My recommendations come from seeing what works on actual roofs. I will explain the methodology behind every cost estimate. This transparency builds trust. You deserve to know the real story.
What is Chimney Flashing and Why Does It Fail?
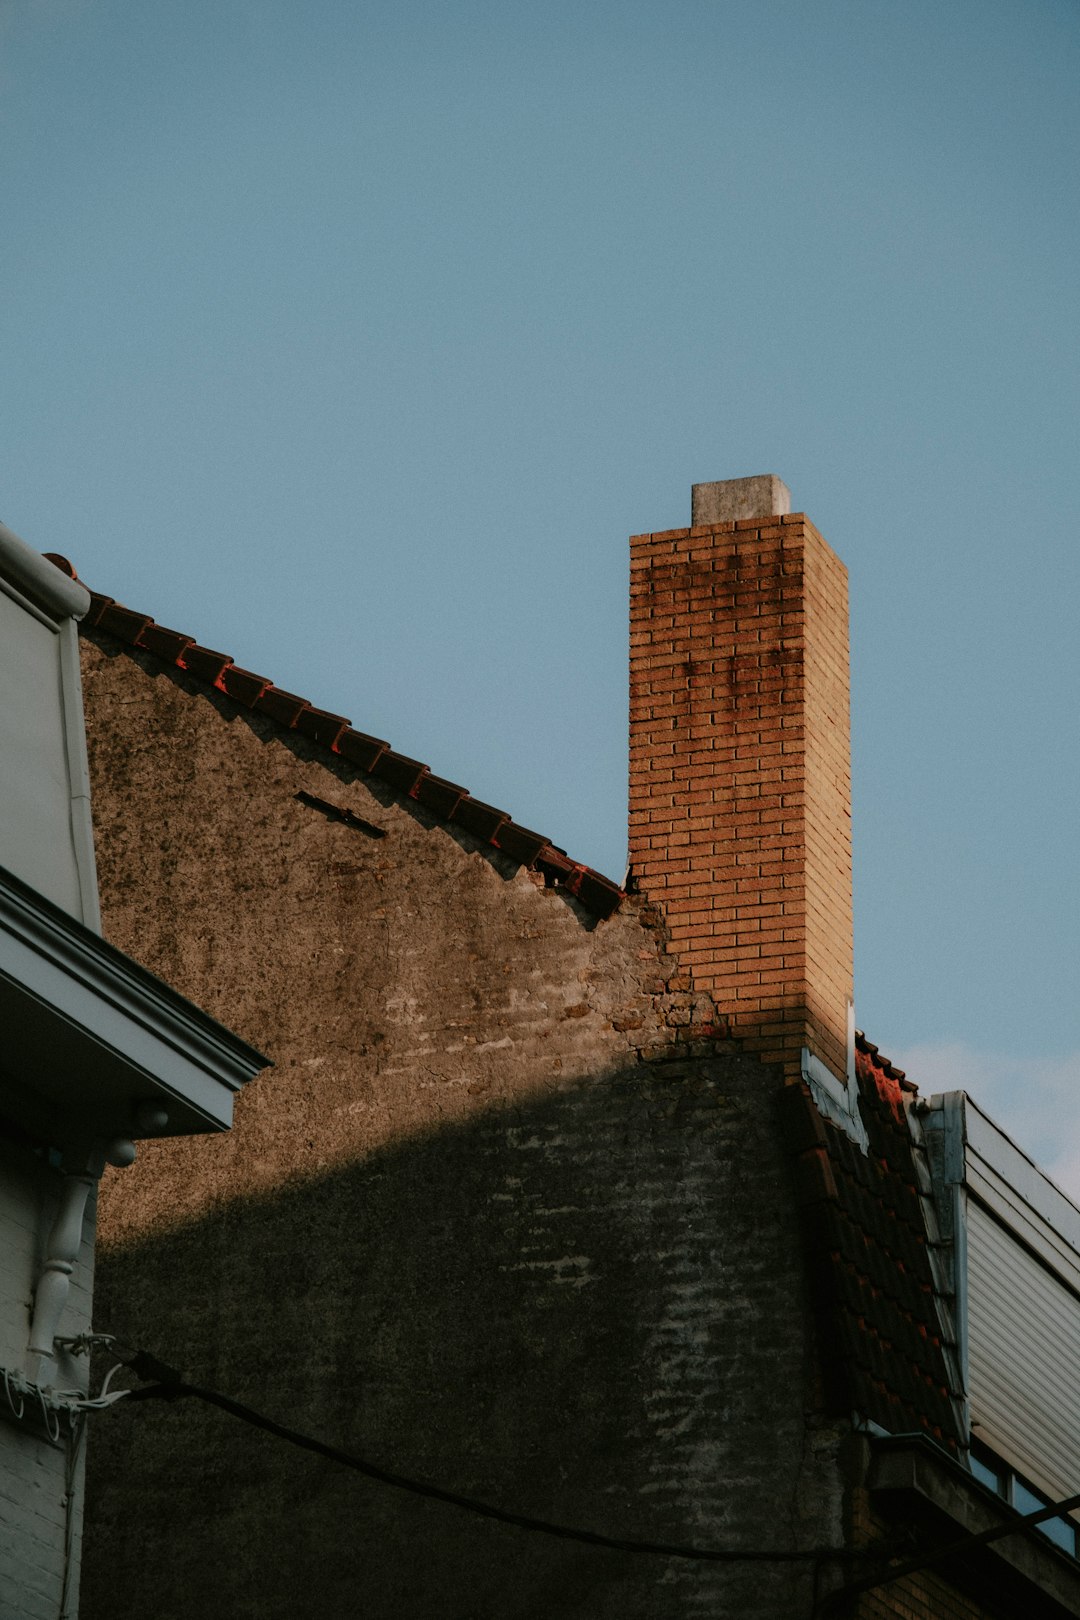
Chimney flashing is a critical waterproofing system. It seals the joint where your chimney meets your roof. It prevents water from entering your home. Proper flashing has several parts. The base flashing attaches to the roof deck. The step flashing integrates with the roof shingles. The counter flashing is embedded into the chimney mortar. The cricket or saddle diverts water around the chimney.
Common Causes of Flashing Failure
Flashing fails for many reasons. Poor installation is the most common cause. Using the wrong materials is another big problem. Normal weather exposure wears materials down over time. Roof movement from settling can break seals. Improper chimney construction leads to early failure. Understanding these causes helps you prevent future issues.
- Improper Installation: Many roofers cut corners on flashing. They use too few nails. They do not seal joints properly. This leads to quick leaks.
- Material Incompatibility: Using galvanized steel with a copper chimney cap causes corrosion. This chemical reaction destroys the flashing.
- Weather Damage: Texas sun degrades sealants. Freeze-thaw cycles crack mortar. High winds can lift and tear metal flashing.
- Structural Movement: Houses settle over decades. This movement pulls flashing away from the chimney. Gaps form and water gets in.
Detailed Cost Breakdown: What You Will Actually Pay
Chimney flashing repair costs vary widely. The national average is between $300 and $1,500. In Texas, typical costs range from $400 to $2,000. The final price depends on many factors. A simple resealing job costs much less than a full replacement. The chimney height and roof pitch change labor time. Material choice has a big impact on price.
Cost by Repair Type
Different problems require different solutions. A minor leak needs different work than major damage. Here are typical price ranges based on repair type.
- Resealing/Caulking Only: $200 - $500. This is a temporary fix for minor leaks. It involves applying new roofing sealant to existing flashing. It does not address underlying problems.
- Partial Flashing Repair: $400 - $900. This fixes specific damaged sections. It might replace one side of step flashing. It often includes some mortar repair on the chimney.
- Complete Flashing Replacement: $800 - $2,500+. This removes all old flashing. It installs a brand new system. This is the most durable solution for older homes.
- Flashing Replacement with Cricket: $1,200 - $3,000. Adding a cricket (water diverter) increases cost. This is necessary for wide chimneys. It provides superior water protection.
Real Project Examples from Our Files
Let me share actual project costs from our records. These examples show how different situations affect price. All projects are from the Houston area in the last three years.
Example 1: Simple Resealing Job
Location: Kingwood single-story home. Problem: Minor leak during heavy rain. Solution: Clean existing aluminum flashing. Apply GAF WeatherWatch® ice and water barrier. Seal with high-grade polyurethane caulk. Total Cost: $375. Outcome: Leak stopped. Homeowner satisfied with temporary fix.
Example 2: Complete Copper Replacement
Location: The Woodlands two-story home. Problem: Corroded galvanized flashing causing persistent leaks. Solution: Remove all old flashing. Install new 16 oz. copper step and counter flashing. Repair chimney mortar joints. Total Cost: $2,150. Outcome: Permanent solution with 30+ year lifespan.
Example 3: Insurance Claim Project
Location: Spring neighborhood after hailstorm. Problem: Hail damaged flashing and surrounding shingles. Solution: Full roof replacement including chimney flashing. Insurance covered all but deductible. Homeowner Cost: $1,000 deductible. Total Project: $14,500. Outcome: New roof and flashing with full warranty.
Material Choices: Pros, Cons, and Cost Impact
Material selection dramatically affects both cost and longevity. Each material has specific advantages. Your choice should consider climate, budget, and home style. I have worked with all these materials extensively.
Aluminum Flashing
Aluminum is the most common choice. It is lightweight and easy to work with. It resists corrosion well in most climates. Aluminum costs $2-$4 per linear foot. It works well with asphalt shingle roofs. The main drawback is softness. It can dent easily during installation or maintenance.
Galvanized Steel Flashing
Galvanized steel offers good durability. The zinc coating provides corrosion resistance. It costs $3-$6 per linear foot. It is stronger than aluminum. However, the zinc coating eventually wears off. This leads to rust, especially in coastal areas with salt air.
Copper Flashing
Copper is the premium choice. It develops a beautiful patina over time. It lasts 50+ years with minimal maintenance. Copper costs $15-$25 per linear foot. The high price reflects its longevity. It requires skilled installation to prevent galvanic corrosion with other metals.
Lead Flashing
Lead is traditional in some older homes. It is very malleable and forms excellent seals. However, environmental concerns limit its use today. Many municipalities restrict lead flashing. Professional installation is absolutely essential for safety.
PVC and Rubber Flashing
These synthetic materials are growing in popularity. They are often used with membrane roofing systems. They offer good flexibility and chemical resistance. Always check manufacturer compatibility with your roof type.
The Professional Installation Process: What to Expect
A proper flashing installation follows specific steps. Understanding this process helps you evaluate contractors. It shows you what a quality job looks like. Each step contributes to the final cost.
Step 1: Inspection and Assessment
The roofer inspects the entire chimney area. They check for leaks in the attic below. They examine the existing flashing condition. They assess the chimney structure and mortar. They measure for material requirements. This assessment determines the repair scope.
Step 2: Material Removal
Old flashing must be removed carefully. The roofer detaches counter flashing from mortar joints. They remove step flashing from between shingles. They preserve undamaged shingles when possible. This labor-intensive process affects project cost.
Step 3: Surface Preparation
All surfaces must be clean and dry. The roofer removes old sealant and debris. They repair any damaged roof decking. They tuck-point crumbling mortar on the chimney. Proper preparation ensures a watertight seal.
Step 4: New Flashing Installation
The roofer installs base flashing first. They integrate step flashing with each shingle course. They embed counter flashing into reglet cuts in the chimney. They apply sealant at all critical joints. Each piece overlaps properly to shed water downward.
Step 5: Cricket Installation (If Needed)
Chimneys wider than 30 inches need a cricket. This triangular structure diverts water around the chimney. The roofer frames it with wood. They cover it with matching roofing material. They flash it integrally with the main flashing system.
Step 6: Final Inspection and Cleanup
The roofer performs a water test if possible. They check all seals and overlaps. They clean the work area completely. They provide documentation and warranty information. They explain maintenance requirements to the homeowner.
Insurance Claims for Flashing Damage: A Practical Guide
Homeowners insurance often covers flashing repair. Specific circumstances trigger coverage. Sudden, accidental damage is usually covered. Gradual wear and tear is not covered. Understanding your policy is crucial.
When Insurance Typically Covers Flashing Repair
Storm damage is the most common covered cause. Hail can dent and compromise metal flashing. High winds can tear flashing from the roof. Falling tree limbs can cause direct damage. Lightning strikes can create unusual damage patterns. Always document damage with photos immediately after an event.
The Insurance Claim Process
Contact your insurance company promptly after damage. Take clear photos from multiple angles. Get a detailed inspection from a licensed roofer. Submit the roofer's estimate with your claim. The insurance adjuster will inspect the damage. They determine coverage based on your policy terms. You pay your deductible. The insurance pays the rest directly to you or the contractor.
Working with Insurance Adjusters
Be present during the adjuster's inspection. Point out all areas of concern. Share your contractor's estimate. Understand that initial offers are often negotiable. Know your policy's coverage limits and exclusions. The Insurance Information Institute provides helpful resources on standard coverage.
DIY vs. Professional Repair: Making the Right Choice
Some homeowners consider DIY flashing repair. This can save money in the short term. However, it carries significant risks. Making the wrong choice can cost much more later.
When DIY Might Be Appropriate
Simple resealing is sometimes a DIY project. If you have roofing experience, you might handle minor repairs. You must have proper safety equipment. You need knowledge of roofing materials. The repair must be easily accessible from the ground. Never attempt work on a steep roof.
When to Always Hire a Professional
Hire a pro for any complete flashing replacement. Two-story homes require professional safety systems. Complex chimney designs need expert knowledge. Matching historic materials requires special skills. Any situation involving insurance claims needs professional documentation.
Cost Comparison: DIY vs. Professional
DIY materials might cost $100-$300. Professional labor adds $300-$1,500. However, DIY mistakes can cause thousands in water damage. Improper installation voids roof manufacturer warranties. Consider the long-term value, not just upfront cost.
Finding and Choosing the Right Roofing Contractor
Choosing the right contractor is your most important decision. A quality roofer saves you money over time. A poor roofer creates endless problems. Follow these steps to find a reliable professional.
Verifying Credentials and Experience
Check for a valid Texas roofing contractor license. Verify insurance coverage (liability and workers' compensation). Look for manufacturer certifications like GAF Master Elite. Ask for references from similar projects. Review online ratings on multiple platforms.
Getting and Comparing Estimates
Get at least three detailed written estimates. Ensure each covers the same scope of work. Compare materials specified (type and gauge of metal). Check warranty terms for labor and materials. Beware of estimates significantly lower than others. They often indicate corner-cutting.
Questions to Ask Every Contractor
- How many chimney flashing repairs have you completed this year?
- What specific materials will you use for my repair?
- Will you obtain all necessary permits for this work?
- How do you handle unexpected issues discovered during repair?
- What is your process for protecting my property during work?
- Can you provide a certificate of insurance before starting?
Preventive Maintenance: Saving Money Long-Term
Regular maintenance prevents costly repairs. Simple annual checks catch problems early. This section provides practical maintenance tips.
Annual Inspection Checklist
Inspect flashing each spring and fall. Use binoculars from the ground if safe. Look for visible gaps or separation. Check for rust or corrosion on metal. Look for cracked or missing sealant. Ensure counter flashing is properly embedded. Check for damaged shingles around the chimney.
Common Maintenance Tasks
Clean debris from the chimney base regularly. Trim overhanging tree branches. Reapply sealant every 3-5 years as needed. Ensure gutters and downspouts direct water away. Keep the roof surface clean to prevent moisture buildup.
When to Call a Professional for Maintenance
Call a pro if you see any signs of water intrusion. Stains on interior ceilings near the chimney require investigation. Any visible daylight through flashing joints needs immediate attention. Significant mortar deterioration on the chimney needs repair.
Frequently Asked Questions (FAQ)
How long should chimney flashing last?
Properly installed flashing should last 20-30 years. Aluminum and galvanized steel typically last 20-25 years. Copper flashing can last 50+ years. The lifespan depends on installation quality, material choice, and local climate. Regular maintenance extends the life of any flashing system.
Can I repair flashing without replacing the entire roof?
Yes, flashing repair is often done separately from roof replacement. A skilled roofer can integrate new flashing with existing shingles. However, if your roof is near the end of its life, consider doing both together. This approach often saves money on labor costs for separate projects.
How do I know if my flashing is failing?
Look for water stains on interior ceilings near the chimney. Check for moisture in the attic around the chimney chase. Look for visible rust, cracks, or separation from the outside. During rain, have someone check for water entry in the attic. These are all signs of flashing failure.
Does homeowners insurance cover flashing repair?
Insurance typically covers sudden, accidental damage. Storm damage from hail or wind is usually covered. Gradual deterioration from age is not covered. Always check your specific policy terms and deductibles. Document damage thoroughly with photos before making a claim.
What is the most durable flashing material?
Copper is generally the most durable residential flashing material. It develops a protective patina and resists corrosion. Properly installed copper can last 50+ years. However, it is also the most expensive option initially. Consider your budget and how long you plan to stay in the home.
How much does it cost to add a chimney cricket?
Adding a cricket typically costs $400-$1,200 extra. The price depends on chimney size and roof complexity. Wide chimneys (over 30 inches) benefit greatly from crickets. They prevent water and debris buildup behind the chimney. This investment often prevents future leaks and damage.
Can poor flashing cause mold problems?
Yes, leaking flashing can cause serious mold issues. Water entering through failed flashing soeps into wall cavities. This creates perfect conditions for mold growth. Mold remediation can cost thousands of dollars. Fixing flashing leaks promptly prevents these expensive secondary problems.
Industry Statistics and Data
The National Roofing Contractors Association (NRCA) provides valuable data. According to their research, improper flashing causes 90% of roof leaks at penetration points. The NRCA recommends specific flashing details for different roof types. Following these guidelines ensures long-term performance.
Building codes also dictate flashing requirements. The International Residential Code (IRC) Section R903 addresses flashing. It requires flashing at all roof intersections and penetrations. Local Texas building codes may have additional requirements. Always ensure your contractor follows current code standards.
Step-by-Step Guide to Getting Your Flashing Repaired
Follow this proven process for successful flashing repair. These steps come from managing hundreds of projects. They ensure you get quality work at a fair price.
Step 1: Initial Assessment
Identify signs of flashing failure. Document with photos. Check your insurance policy for coverage. Determine your budget for the repair. Decide if you need immediate emergency service.
Step 2: Contractor Selection
Research local licensed roofers. Check reviews and credentials. Contact 3-4 contractors for estimates. Ask detailed questions about their process. Verify insurance and warranties.
Step 3: Estimate Review
Compare all estimates side-by-side. Ensure they cover identical scope. Check material specifications. Review warranty terms. Ask for clarification on any unclear items.
Step 4: Project Scheduling
Choose your contractor. Sign a detailed contract. Schedule the work for dry weather. Make arrangements for property protection. Prepare for the workday logistics.
Step 5: Project Supervision
Be available for contractor questions. Verify materials upon delivery. Do a final walkthrough after completion. Ensure proper cleanup. Get all warranty documentation.
Conclusion: Your Path to a Watertight Chimney
Chimney flashing repair is a critical home maintenance task. Understanding the costs involved empowers you as a homeowner. You now know typical price ranges for different repairs. You understand how materials affect both cost and longevity. You have learned when insurance might help with costs.
The most important takeaway is quality matters. Proper installation prevents future problems. Choosing the right contractor ensures a lasting repair. Regular maintenance extends the life of your investment. Addressing issues promptly saves money over time.
Your next step is action. Inspect your chimney flashing today. Look for the signs we discussed. If you see problems, contact qualified professionals. Get multiple estimates. Ask informed questions. Make a decision based on value, not just lowest price. Your home deserves protection from water damage. Proper flashing provides that protection for decades.